7 Homemade DIY Compost Bins & Piles
- Deb
- Apr 6, 2024
- 8 min read
Updated: Aug 15, 2024

Disclosure: Some of the links on this page are affiliate links, and I may earn a commission if you click through and make a purchase.
From apple cores and eggshells to leaves, grass clippings, and garden leftovers, composting is a rewarding practice that transforms organic waste into a nutrient-rich soil amendment and (bonus!) keeps that organic waste out of landfills. And you don’t need any pricey bins or special tools to do it. While there are many commercially available composting solutions, creating your own DIY compost bins and piles allows you to customize them to fit your space, needs, and budget. Today, we'll cover a variety of DIY composting methods, from wooden pallet bins to tumbler composters, providing basic instructions (because they’re easy to make) and composting tips along the way.
You may already have the materials on hand to make one or more of these DIY compost bins or piles, so use, reuse, and repurpose away!
1. Basic DIY Compost Bin: Wooden Pallets
Pallets offer a simple and cost-effective—potentially free—option for constructing a compost bin, with the gaps in the pallets allowing for good airflow. To create one, gather three or four pallets of similar size. Stand them upright and secure them together using screws, wire, rope, zip ties, chain, or whatever else you might have on hand to form a triangle or square. Allow for one side to be opened so you can access the pile for turning. If the gaps in the pallets are wide enough for compost materials to fall through, you can tack chicken wire or other wire mesh onto the outside of the bin. And that’s it: Your repurposed pallet compost bin is now ready to use. Fill it with alternating layers of green and brown materials, turning the pile regularly with a shovel or pitchfork for optimal decomposition. One option is to create a second bin to turn the compost into and then back to the original bin the next time you turn it.
Cinder blocks and straw bales are good alternatives to wood pallets for creating a basic DIY compost bin.
Tip: Compost Watering
A compost pile or bin should be watered every three to seven days. However, the frequency and amount of water needed can depend on various factors, such as the amount of compost you have and its location, which may be exposed to precipitation.
For optimal aerobic composting, a compost pile should be damp but not soggy, similar to a wrung-out sponge, and it shouldn’t smell bad. If the compost mixture is very wet, you might need to turn it daily until the moisture level comes down. |
2. A DIY Trash Can Compost Bin

Repurpose one or more large plastic or metal trash cans into functional compost bins. Just drill small holes around the sides and bottom of the bin for adequate airflow and drainage.
Place the bin in a convenient location and begin adding green and brown compostable materials. Secure the lid to keep pests out and periodically mix the contents or transfer them to a different trash can to promote decomposition.
This type of DIY compost bin is perfect for small spaces and smaller amounts of kitchen scraps and yard and garden waste, and it can be easily moved if needed.
Tip: Adjusting the Moisture Content of a Compost Bin You can adjust the wetness of a compost bin or pile by the ingredients you add. More dry, carbon-based materials, like dry leaves, pine needles, or sawdust, will help dry out a soggy heap, and more fresh, wet ingredients, such as leftover coffee and tea and vegetable and fruit scraps, will add moisture. |
3. Wire Mesh Cylinder Bin
Repurpose wire mesh, fencing like chicken wire, or hardware cloth to create a cylindrical compost bin. Start by cutting a piece of wire mesh to your desired height and length—for example, cut a 9-foot-long piece for a diameter of approximately 2 feet 10 inches. Form the mesh into a cylinder shape and secure the ends together with wire, rope, zip ties, small carabiners, etc. You can also use a longer piece of wire mesh or chicken wire, overlapping it to start with a smaller cylinder and then expand it as your pile grows, as this two-piece commercial wire composter does. Place the wire mesh bin in a suitable location, secure it with poles or T-posts as needed so it won't blow away or tip over, and begin adding compostable materials. The open design allows for excellent aeration and easy watering as needed. To turn the pile, either start a second cylinder bin or remove the wire from the one you’ve made, form a new cylinder next to the first one, and turn the pile into it.
Tip: Compost Layering As you’re adding to your compost bin, alternate layers of green (nitrogen-rich) and brown (carbon-rich) materials. This helps create a balanced environment for decomposition. Greens include vegetable scraps, fruit peels, grass clippings, and coffee grounds, while browns are things like dried leaves, straw, pine needles, and cardboard. So, if your daily additions tend to be greens from your kitchen or garden, add a layer of browns every so often. |
4. Stackable DIY Compost Bins
Stackable compost bin systems offer flexibility and scalability. You can either purchase commercially available stackable bins or create your own using plastic storage bins or wooden boxes. Stack the bins on top of each other, adding new layers of compostable materials as needed. The stackable design makes it easy to manage multiple batches of compost and expand your composting capacity over time. Here's an easy stackable compost bin design from the Vegetable Garden Guru.
Tips: Things NOT to Compost Avoid putting meat, fish, dairy products, and other oily or fatty food in your compost bin. These things can attract critters and create rather unpleasant odors. They also break down at a slower pace. While not suitable for regular composting, you can use a Bokashi composting system specifically designed for meat, dairy, and oily items. Bokashi fermentation breaks down these materials, and the resulting compost can be buried in your garden or added to regular compost bins after the fermentation process. |
5. DYI Tumbler Composter
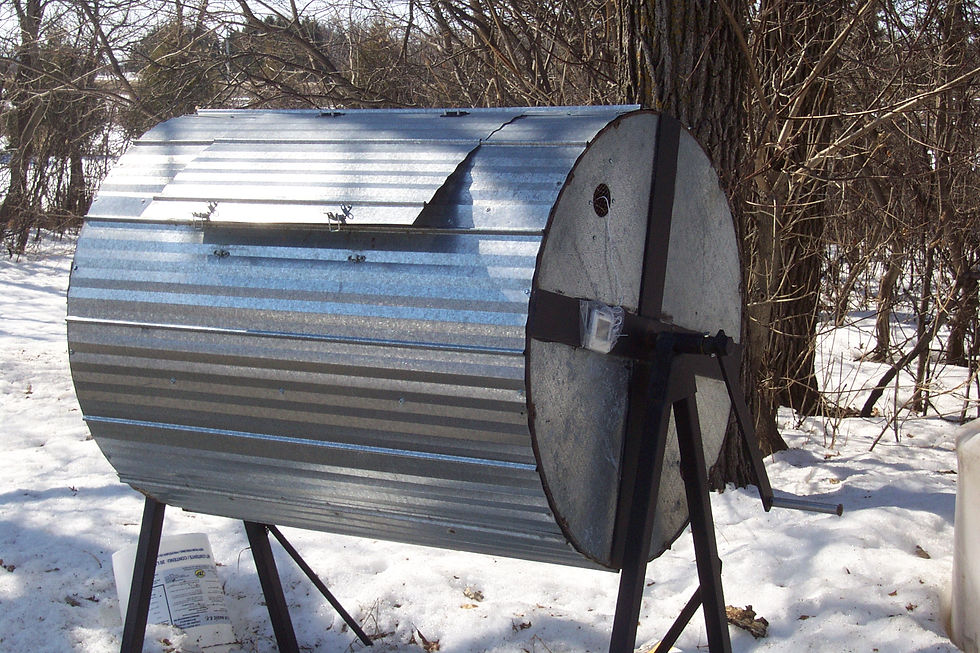
Tumbler composters, aka compost spinners, provide a convenient way to turn and mix compost materials, speeding up the decomposition process. While you can certainly buy a tumbler composter, you can also make your own by repurposing a large barrel or drum. Just make sure you know what was in it before to avoid any nasty chemicals or fuel residue. Rain barrels make for great compost tumblers, too. Mount it on a sturdy frame or axle to allow for easy rotation. As you fill the tumbler with compostable materials, give it a spin every few days to aerate and mix the contents. Tumbler composters are ideal for small spaces and produce compost more quickly than traditional methods.
Here's a good how-to from down under...
Tip: Making a Compost Tea You can brew a nutrient-rich compost tea using your finished compost. Fill a bucket or basin with water and add a generous scoop of compost. Let this steep for a day or two, stirring occasionally. Strain out the solids, leaving behind the liquid—this is your concentrated homemade compost tea. Use this as a soil drench by diluting it with water (about 1 part tea to 4 parts water) and pouring it around the base of your houseplants or container plants for an occasional nutritious spa treatment. |
6. Pit Composting
Pit composting is a straightforward method that requires minimal setup and is perfect for small spaces. Start by digging a pit in the ground, approximately one to two feet deep. Layer compostable materials in the pit, alternating between green and brown materials. Optionally, cover the pit with soil or a lid to help retain moisture and heat. Pit composting integrates seamlessly with the soil ecosystem, allowing microorganisms to break down organic matter naturally.
Tip: Composting Pine Needles Yes, you can compost pine needles, too. However, there are a couple of important things to keep in mind:
|
7. The Simple Compost Heap
Very simple, very easy, yet more accessible to critters, the classic compost heap requires no enclosure at all and allows for free-form composting. Simply designate an area in your yard for your compost heap and begin adding compostable materials. As always, layer greens and browns and occasionally turn the heap to promote decomp.
Tip: Using your Finished Compost
While it’s possible to plant directly into compost, it’s better to combine it with other soil, like your existing garden soil. Aim for a 1:1 ratio of compost to soil. Pure compost can be too rich and may retain too much moisture, potentially suffocating plant roots.
For potted plants, you can use compost as a top dressing, spreading a layer over the surface. This compost layer acts as a slow-release fertilizer and helps retain moisture.
For seedlings, mix compost with the surrounding soil to prevent root burn. |
Choose DIY Compost Solutions to Fit Your Needs
Whether you opt for a basic wooden pallet bin, a more complex tumbler composter, or another type of DIY composting solution, the key is to find one or more methods that work for you, your environment, and the amount of compostable kitchen, yard, and garden waste you generate.
By composting at home, you're not only reducing waste but also enriching your soil and contributing to a healthier planet, so it's a win-win-win situation. What kind of composting bin do you use? Please share your ideas and suggestions or composting questions in the comments below.
Compost Bin FAQs
What materials do I need to make a basic DIY compost bin from wooden pallets? To make a basic compost bin from wooden pallets, you need three or four pallets of similar size, screws, wire, rope, zip ties, or chains to secure them together. Optionally, you can use chicken wire or other wire mesh to prevent compost materials from falling through the gaps.
How often should I water my compost pile or bin? A compost pile or bin should be watered every three to seven days. The compost should be damp but not soggy, similar to a wrung-out sponge. If it's too wet, you may need to turn it daily until the moisture level is appropriate.
Can I make my own tumbler composter? Yes, you can make your own tumbler composter using a large barrel or drum. Mount it on a sturdy frame or axle to allow for easy rotation, and spin it every few days to aerate and mix the compost materials.
What is pit composting, and how do I do it? Pit composting involves digging a pit about one to two feet deep, layering green and brown compostable materials, and optionally covering the pit with soil or a lid. This method allows microorganisms to break down organic matter naturally.
Can pine needles be composted, and what should I keep in mind? Yes, pine needles can be composted. However, they decompose very slowly, so it's best to use them in moderation, not exceeding 10% of your compost pile. Over time, as pine needles turn brown, their acidity diminishes, making them suitable for composting.
What are the benefits of using compost tea, and how do I make it? Compost tea is a nutrient-rich liquid made by steeping finished compost in water for a day or two. Strain out the solids, dilute the liquid with water (1 part tea to 4 parts water), and use it as a soil drench to provide nutrients to your plants.
What ratio of compost to soil should I use when planting? When planting, it's best to combine compost with other soil in a 1:1 ratio. Pure compost can be too rich and may retain too much moisture, potentially suffocating plant roots. For potted plants, use compost as a top dressing, and for seedlings, mix it with the surrounding soil to prevent root burn.


Commenti